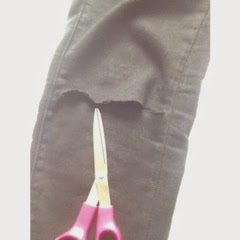
Related to my last blog post on customising jeans, here is my DIY tutorial on how to rip your jeans!
Your can either rip your favourite jeans or a brand new pair from the shops but I would suggest making sure they are slightly worn or have at least been washed, this softens the fabric making the cutting and ripping process so much easier.
You can rip your jeans anywhere you'd like and however many times you'd like. Blue denim jeans look great with this ripped effect but I have chosen to do mine on my black skinny jeans which where £5 from Primark. I pretty much only wear black jeans plus I'm trying to copy the style of my fav, Luke Hemmings from 5sos.
You will need - scissors, either a pen or pencil (I used a sharpie so you could see it on the black), and ruler.
First you need to choose where you want your rips, I chose the knee of my jeans. You then draw either a line or an oval, depending on the size of rip you want. I drew my line with a ruler from hem to hem on the leg.
Next you want to cut along the line, making sure not to go through both pieces of fabric, only cut the top piece.
After cutting the material you are free to do what you want, your can either rip it some more with your hands, leave the material frayed for a more messy look or add more rips on other areas of your jeans.


No comments:
Post a Comment